| Dave Weikel's Olympus E-10 Page |
| Disable the
FL-40 Pre Flash |
It's a fact of life that the E-10 and most other digital cameras (in all price ranges) use a low power flash pulse to set the exposure of the main flash, which follows a few milliseconds later. Many people can't tell that two flash pulses occurred. . . some can, and some blink. In fact, some people blink just fast enough that their eyes are partially or completely closed when the actual image is captured.
This "pre flash", as it is frequently called, is also the reason that you can't use a conventional remote flash trigger on a second strobe. The pre flash sets off the remote strobe just milliseconds before the main flash goes off. Since the duration of the flash is typically less than one millisecond, and the time between the two flash pulses is in the 10s of milliseconds, the picture get no benefit from the remote strobe unit. But back to people and blinking eyes.
I've taken thousands of pictures of people with the E-10 and FL-40 and most of the time I get open eyes. I have also had a few of those closed-eye shots that I really hated to lose. So I began playing with the FL-40 to see if there was a work-around - some way to eliminate the pre flash and still allow the FL-40 to operate automatically. As you have guessed by now, there is. Olympus mentions in the manual that the FL-40 can be used in automatic mode with non-Olympus cameras. It's just like using a Vivitar or Metz flash, the strobe does all the work, and the camera uses fixed settings. There is only one flash pulse - no pre flash.
|
The FL-40 is completely capable of operating as a stand-alone automatic flash. All you need to do is set the ISO and f-stop to match the camera. The sensor on the front measures the flash instead of getting the information from the E-10. | ||

The problem is this. When you place the FL-40 on the E-10, they "know" they are connected and insist on operating in Through The Lens (TTL) flash mode. Olympus provided no way to disable this feature, but it sure seems like they could. So the trick is to just keep the flash and camera from talking to one another, and it's easy to do.
|
To make the FL-40 function as a stand along automatic flash, just deprive it of the control lines in the E-10 hot shoe. A piece of paper or plastic will do it. | ||
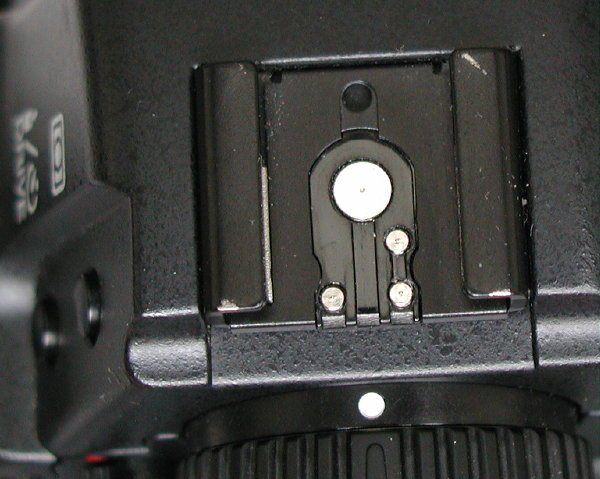
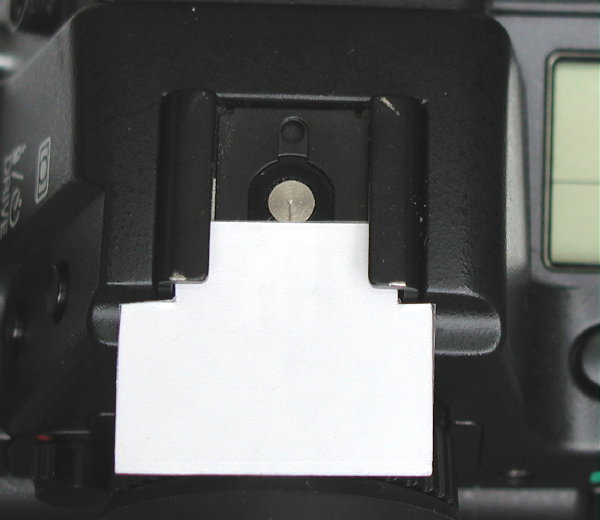
The contacts in the hot shoe that allow the FL-40 and E-10 to communicate are in front of the one that is used to set off the flash. All you need to do is insulate the camera contacts from the flash contacts and you're in business. I used a piece of paper with Scotch tape on both sides to add a little durability. It could just as easily have been a piece of thin plastic. Just don't use a Post-it-Note because after awhile the glue could cause connection problems when you want to operate in TTL mode.
|
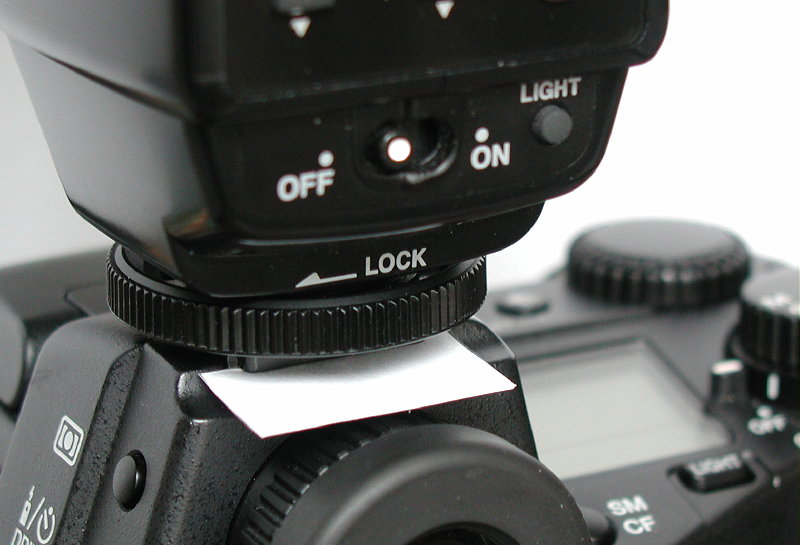
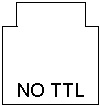
Lock the FL-40 in place as usual. The paper or plastic insert will block the TTL signals from the flash. A sample insert is available at the bottom of this page. |
I just blocked the contacts and locked down the FL-40. There is more than enough pressure to hold the paper in place.
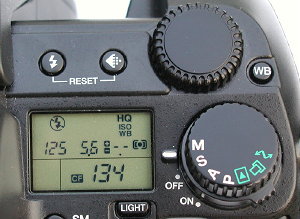
For many of us, the rest is almost second nature - just set up the camera and flash like your old 35 SLR and Vivitar 285. For starters, there are two settings that MUST be made manually, white balance and ISO. You don't want the camera trying to compensate for low light conditions when you're actually using the flash. White balance should be set to 6500 and you can choose the ISO you need for the situation - I almost always use ISO 80.
Next, you need to leave Program mode behind. You can use Aperture preferred mode, but you'll be better off just going to full manual. Choose a shutter speed that fits the situation, like 1/50 or 1/60 for a room with some ambient light in the background. Next choose one of the f-stops available on the flash - more about that in a moment. Remember that in manual mode the camera isn't making any of the settings for you, but the meter is still working. If you set it for spot or weighted average, you can easily check background objects in the ambient light and make adjustments to the settings as required to set the mood of the photo.
|
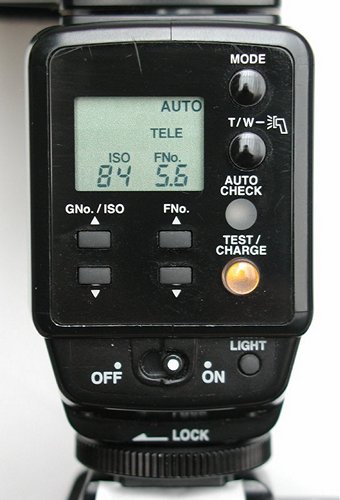
Manual camera settings. In this case, 1/125 of a second and f 5.6. White balance of 6500 and ISO 80. This might be used as a fill flash setting for an outdoor shot in shade, or indoors to eliminate most ambient light. |
Set the ISO on the flash as close to the camera as possible. It seems a little goofy to me that the E-10 uses ISO 80, 160 and 320 while the FL-40 offers 84, 170 and 340. Anyway, for ISO 80 on the camera, you can use either ISO 71 or 84 on the flash, depending on whether you want your images just a bit over or under exposed. In digital, it's better to under expose a bit and draw out the detail with PhotoShop. In an overexposed image, it's more difficult to make pixels that don't exist.
If you're using a ProMax Pocket Bouncer, you should derate the flash to ISO 71 or 59. You'll have to play around with it to match your shooting style and requirements.
Next, set the f-stop you will be using on the camera - the FL-40 will allow you to choose from several power settings. At ISO 84, the usable settings are 2.8, 4.0, 5.6, 8.0 and 11. Of course as the f-stop goes up, the flash range goes down. This is one thing I don't have at the moment - a flash range table.
|
||||||
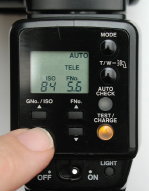

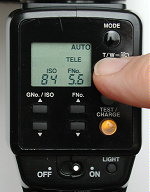
Finally, you can manually switch the FL-40 from wide angle to telephoto mode. This will allow you to get a little extra range from the flash. Set the flash for "wide" when the camera zoom is set between 9mm to 18mm , and "tele" when working above 18mm. If distance isn't an issue, you can leave the flash set to wide all the time.
Last but not least, here's a little template for the insert between the flash and camera. This is a MS Word file that will print the correct size image. Just cut it out and use it. I suggest putting ONE layer of Scotch tape on the front and back of the paper before you cut it out. Don't make it too thick or you'll jam the flash in the hot shoe.
 Download MS Word document with 1:1 scale outline of insert tab. |
This is one possible design for the insert tab - it even has a reminder that you're not shooting in TTL mode. Honestly, any little piece of paper will do. |
You'll have to experiment to see how or if this works for you. But if you want an automatic flash and don't want a pre flash, this is the only way I know of to do it with the FL-40.
Oh, there is just one other little thing . . . .
At close range (6 feet or so), at the f-2.8 setting, the flash will keep up with the E-10 in full burst mode for all 4 shots! No kidding.
Good luck, have fun! Dave